
Fancy Stitched Pockets for the Companion Carpet Bag {Daryl from Patchouli Moon Studio}
13:00
Hi lovelies,
Today we've got a real treat! Daryl from Patchouli Moon Studio is here to show us how to really jazz up our handmade bags with some extra embellishment!

Hello, I am Daryl
of Patchouli Moon Studio and I am here to share with you how I made my
fancy decorative stitched exterior pocket(s) on my Companion Carpet Bag by using the decorative and utility stitches on my sewing
machine. Plus, you can also couch a variety of yarn textures, add
trim such as rickrack, add some hand embroidered stitches if you like
and then add more bling with sequins, buttons, hot fix crystals, or
beads. The choices are yours. There are so many possibilities so do
what appeals to you and use what materials you have on hand.
Supplies needed:
- Small amounts of yarn in a variety of colors, textures and thicknesses
- Invisible thread for couching yarn
- An assortment of thread types and colors, such as polyester, rayon, metallic, cotton, solid colors and; variegated colors. Choose at least 10 colors
- Bobbin thread (this is thinner thread than regular thread weight)
- Extra bling as desired: buttons, sequins, ribbon or trim, hand embroidery floss or perle cotton, hot fix crystals, beads
- Medium weight fusible interfacing (I prefer Pellon Shape Flex SF101)
- Foam stabilizer or fleece: use whatever you will be using for making the rest of your bag ( I prefer a foam stabilizer such as Annie’s Soft and Stable or Bosal’s In R Foam)
- Machine embroidery needle and metallic needle if you choose to use metallic thread
- Fabric for your pocket(s). Choose a solid color or one that reads solid from a distance or you can choose batik, hand dyed or a mottled fabric too. Just make sure the fabric isn’t too busy or that it has too many colors because you want your stitching to stand out and not get lost in the fabric
- Lining fabric for your pocket. This can be the same as the exterior fabric or the fabric you choose to line the rest of your bag with.
- Optional: contrast fabric for binding the top of the pocket
- Open-toe presser foot or zigzag foot; couching foot if you have one
- Also you will need all the materials that are listed in the pattern for making the Companion Carpet Bag. You do want to make this bag! It’s simple, yet fabulous!!! It’s one of my all time favorite bags! I get more compliments on this bag than any other I have made. I have made 3 of these bags (smaller size) so far and will make more because it’s the perfect size and shape (for me).
Before you start
gathering your supplies, please read over the instructions below to
get an idea of what lies ahead. Since there are a lot of options and
materials that you can choose to use or not use, it might be helpful
to see what you will be doing first before you purchase anything.
That’s why you might want to use what you already have on hand for
your first attempt and see what you think before investing in a lot
of other supplies.
If you knit or crochet, you will probably have
plenty of odds and ends of yarns of all kinds, if not why not ask
someone who does knit or crochet if they might give you some leftover
scraps of yarn in a variety of textures, weights and colors. You will
only need lengths of 7 ½”-10” pieces and approximately 9-13
pieces (or more) for each pocket you make. You can create your
pocket(s) without yarn, but I think it provides more visual interest
using a variety of yarn textures. But the choice is yours whether you
want to use yarn or not.
 |
| Here is a variety of yarn textures, thicknesses and colors. Plus rickrack too. |
Okay gather your
supplies and let’s get started. I made the smaller size Companion
Carpet Bag, but if you are making the larger bag, you will be doing
the same thing only your pocket(s) will be larger.
First you will cut
your exterior fabric and interfacing about 1” larger than the
largest measurement of your pocket piece. So for the smaller bag
size, the widest part of the pocket measures about 12 ½” across
and so I cut my exterior fabric about 13 ½” wide. The height of
the pocket is 6 ¼”, so I cut the height 7 ½” (Instead of
cutting 7 ¼”, I added a bit more just to make sure). So I cut my
exterior pocket fabric 13 ½” W x 7 ½” H.
If you are making the
larger bag, you will cut your piece according to the size it
measures, plus 1-inch. Now cut a piece of your fusible interfacing
the same size and fuse to the wrong side of the fabric.
*Note if you are
making two pockets (one on each side of the bag) like I did, then you
will need to cut out 2 fabric pieces and 2 interfacing pieces.
Next you will cut
out one piece of fleece or foam (depending on which you are using for
your bag) the same size as you cut your exterior and interfacing
piece. If making 2 pockets, then cut out a second piece of fleece or
foam. Set the fleece or foam aside for now.
If you will be
adding yarn to your pocket piece(s), then you will need to thread
your machine with invisible thread and put a couching foot if you
have one or your zigzag foot on your machine. You can just free-form
couch the yarn in place with a zigzag stitch or if it will help, you
might want to draw wavy lines across your piece to use as a guide for
not only your yarn, but where you will be sewing your decorative
stitches on later too. Use a fabric marker of your choice to mark
your lines.
 |
| Different yarn textures zigzag-stitched in place with invisible thread. |
Set your zigzag
stitch width so that it will stitch over the width of the yarn. You
will need to adjust the width to fit the width of the yarn you are
using and you might need to change this width setting for each yarn
you use if you are using a different width of yarn each time. The
stitch length can be set as desired. I think I chose a 2.5 stitch
length. If you have a couching foot, then make sure the yarn is
tucked into the groove of the foot so that it makes it easier to
stitch over the yarn.
If using a zigzag foot, you will have to guide
the stitching over the yarn more carefully and go slowly. Practice on
a scrap of fabric with your yarn first. This should be fun and not a
chore! If you have any problems you might want to skip the yarn and
just go to the decorative stitching. You can also stitch rickrack or
other narrow trim in place now too.
 |
| Yarns couched down with zigzag stitch using invisible thread. |
Note the drawn line on the
left side. I drew lines and sewed the yarn in place following the
drawn line. You can draw lines or stitch free-form.
I like to space my
couched yarns out so that I am stitching down 7-9 pieces of yarn on
the smaller bag or up to 13 pieces for the larger bag pocket. But the
choice is yours how many yarn pieces you want to couch. Just space
them out somewhat evenly over the pocket so that you don’t have all
the yarn sewn on one side.
 |
| All the yarn has been couched in place here. |
Let's start
stitching down your yarn in place. Take your exterior piece with the
interfacing fused on the wrong side and start couching down your yarn
on it with a zigzag stitch and the invisible thread and your
embroidery needle on your machine. You can use a colored thread that
matches your yarn if you do not have invisible thread. The thread
will show on the yarn and sometimes that looks nice, but I find it
easier to use invisible thread since my yarn choices are varied and I
want the yarn to show on its own. Continue to couch your yarns in
place until you have done as many as you desire.

Then remove the
invisible thread from your machine. Now thread your machine with any
color of your choice and any thread type, except do not use metallic
thread yet. Next choose a decorative stitch on your machine. I like
to stitch equal number of satin-type stitches with equal number of
lighter lacier type stitches and space them out so they are balanced
looking. What I tend to do is stitch 2-3 different stitches in the
thread color I choose and then change thread to a different color and
stitch 2-3 different stitches in that color and so on. Make sure
that you sew slowly when you stitch the wavy curves.
Some stitches
will look distorted if you go too fast when stitching. Using utility
stitches such as a zigzag stitch is just as good as choosing a stitch
that stitches out a heart design for instance. You might not have as
many decorative stitches on your machine, so use whatever stitch you
like the look of. Leave at least 1/8”-1/4” space between your
stitches and or yarn. Do not let your stitches run into the stitches
next to each other or cross over those stitches.
Continue to stitch
your stitches and change your thread colors as desired. If you want
to add some hand embroidered stitches such as French knots later,
then make sure you leave space to do so. Add the hand stitching when
you have finished with your machine stitching. Keep in mind that
later you will be cutting your pocket shape out and you will be
losing some of the stitching on the sides, so place your favorite
stitches in the center area away from the sides in case they get cut
off later.
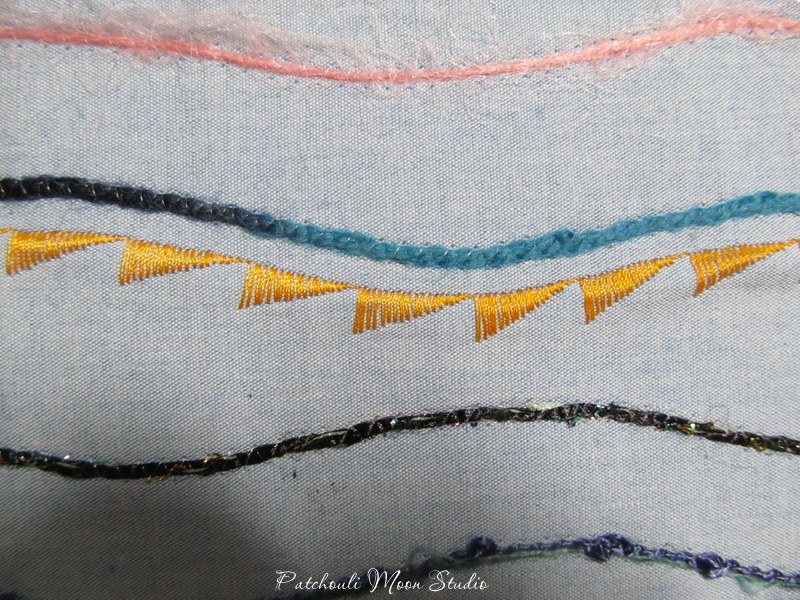 |
| The gold thread here is a satin stitch type decorative stitch. |
 |
| The gold thread here is a utility stitch that is lighter looking and lacier in appearance. |
 |
| This shows a variety of stitches used. Some are satin type stitches and some more delicate looking. Make sure you leave some space between the stitches and yarn for the quilting later. |
Now you will
retrieve your fleece or foam piece. Pin to the wrong side of your
decorative stitched piece in several places to hold the two layers
together.
Next thread your
machine with a metallic thread color and your metallic machine
needle. Leave your bobbin thread in the machine. I like to add a bit
of bling using metallic thread and I find it easier to use metallic
thread when it is sewn in a straight stitch rather than a decorative
stitch. Metallic thread can break more easily when stitching fancy
stitches and it doesn’t always show up that well either, so how I
use the metallic thread is to quilt the pocket piece using metallic
thread on the top.
You can choose to
use a straight stitch to quilt with the metallic thread or if you
have a triple stitch, you can use that. The triple stitch is actually
for sewing knit fabrics where it sews a stitch forward then backwards
then forward. Or if you have another stitch on your machine that you
want to use then give it a go. I suggest testing your stitch on a
scrap first.
Start your quilting in the center of the pocket between
your decorative stitches. Then keep adding more quilting between your
decorative stitching until you have stitched enough to hold the 3
layers together. Make sure you remove the pins that are holding the
layers together as you get near them. How much quilting you do is a
personal choice, but you should have enough quilting to hold the
pocket pieces together sufficiently.
 |
| Sew straight stitch using metallic thread between the decorative stitching and yarn. |
 |
| I sewed the metallic thread here between the gold thread and yarn. |
 |
| The quilting is all done in the metallic thread. You can use all one color metallic thread or use a variety of different colors of metallic thread. |
 |
| This is the second pocket piece that has been quilted in the metallic thread. Below is the back side of the piece showing the foam and the quilting lines of the bobbin thread. |

Once the quilting is
completed. Give your piece a pressing on the front. Be careful that
you do not melt your yarn or thread, so you might want to use a
pressing cloth on top of the stitching or use a piece of fabric that
will fit over the piece.
Next you will fold
the stitched fabric in half and pin your pocket pattern piece to the
fabric and cut out your pocket. If you want to add more bling, you
can sew buttons, sequins, beads, hand embroidery stitches or hot fix
crystals to your pocket piece now. Make sure you keep these items at
least 1” away from all edges. You want to make sure they are not in
the way of the seam allowance, and you do not want your presser foot
to get caught on anything either as you sew the pocket into the bag
later.
 |
| Pocket shapes have been cut. |
 |
| I added some hot fix crystals to both pockets. |
 |
| Hot fix crystals on this side too. |


Optional: top
binding on the pocket. Instead of adding piping, I cut a strip of
contrasting fabric and sewed it like a quilt binding. If you want to
do this cut a fabric strip 2 ¼” wide or 2 ½” wide and a little
longer than the top edge of your pocket. Cut your lining pocket piece
out and place wrong-sides-together with the stitched exterior pocket
piece. Pin in place to hold together. Next fold the binding piece in
half wrong-sides-together and line up the raw edges of the binding to
the raw edge of the top of the pocket. (Binding is
right-sides-together to the pocket).
You should have some excess
binding fabric hanging off the ends of the pocket since you cut the
binding a bit longer than the pocket edge. Sew the binding to the top
of the pocket with a ¼” seam. Finger press the binding to the
lining side of the pocket. You can now hand stitch the binding in
place to the lining, or machine stitch-in-the-ditch between the
binding and the pocket on the right side of the pocket, catching the
binding on the lining side in the stitching. I find it easier to
machine stitch-in-the-ditch if I cut the binding at 2 ½’ wide.
Trim off the excess binding at the top of the pocket following the
angle of the pocket. (Sorry I don't have photos of this step as it
was an after thought to include it here).
If you want to add
the magnetic snap to the pocket lining piece, then follow the pattern
instructions on how to do so. I chose not to add any snaps to my
pockets.
Baste by machine
1/8” from the raw edges of the pocket all around the side and
bottom to hold the lining in place. Make sure you baste this after
you add your snap piece in place, if you are adding a snap.

Baste around the
pocket 1/8" from edge.

Pocket is basted
around the edges to hold the lining in place and keep the stitches
from coming undone too. (If adding a binding to the top of your
pocket, your binding will be sewn on here. I took this photo before I
sewed on my binding).
Now get out your
Companion Carpet Bag instructions and follow Samantha’s wonderful
instructions to complete your bag.


 |
| I quilted the gusset as well as the front and back main pieces. |

 |
| I sewed a pen pocket in the center to divide the slip pocket. |

 |
| All my stuff fits inside. |
Note: I made other
changes to this bag too. I chose to make my own handles rather than
purchase them and I sewed them my own way. I cut out 2 lining pocket
pieces from the exterior pocket pattern piece and sewed them into a
divided slip lining pocket, including a place for my pen, rather than
the smaller slip pocket in the instructions. I added a binding to the
top of the slip lining pocket.
I chose not to add the magnetic snap
to the exterior pocket on this bag (I did for the first Companion
Carpet Bag I made though). I made 2 exterior pockets rather than one.
I didn't add the snap tab closure to my bag either. There are so
many things that you can do to add your own touches to this wonderful
bag that I suggest you decide what you like to add or subtract and
just go for it.
The fancy stitches
technique would also be fabulous to stitch decorative stitches on the
flap of the Stella Pleated Bag (also by Samantha). Pockets or flaps
really lend themselves well for using this technique.
Happy stitching!

Thanks Daryl, I can see this technique being used on so many bags!
Don't forget to show us what you make using Daryl's technique in the facebook group!


9 comments
Oh my gosh, what a great idea!
ReplyDeleteThank you, Benta!
DeleteJust gorgeous, Daryl.
ReplyDeleteThank you for your comment, Pam!
DeleteSO BEAUTIFUL! 😍
ReplyDeleteSo glad you like it!
DeleteI adore Daryl and her unique style she adds to the beautiful bags she sews. The time invested in sewing the decorative stitches and including yarns and bling really make her bags special. Thank you Mrs. H for featuring Daryl in your post. Your bag design is fabulous! Creative Bliss...
ReplyDeleteThank you for the comment, very happy to hear! : )
DeleteStunning, I'm so inspired to try this technique, thanks.
ReplyDelete