
Janome 6600P - What's in the box?
11:01Hello lovelies,
I'm possibly the luckiest girl alive, I just got a new sewing machine, the Janome 6600P!
Amanda and I did a ton of research on what would be the best machine for a bag maker, and we came up with either the 1600p QC or the 6600p, both from Janome that were best suited to me.
I chose the 6600p simply for the other stitch functions that are available, as the 1600p QC is a straight stitch only machine.
I received my new Janome 6600p last week, and took photos as I unboxed it, and my first impressions to share with you. I'll share a full review with you all when I've used it for a few weeks, but for now, it's safe to say that I am head over heels in love with it!
I took these photos as I unpacked the machine, so try to imagine my excitement!
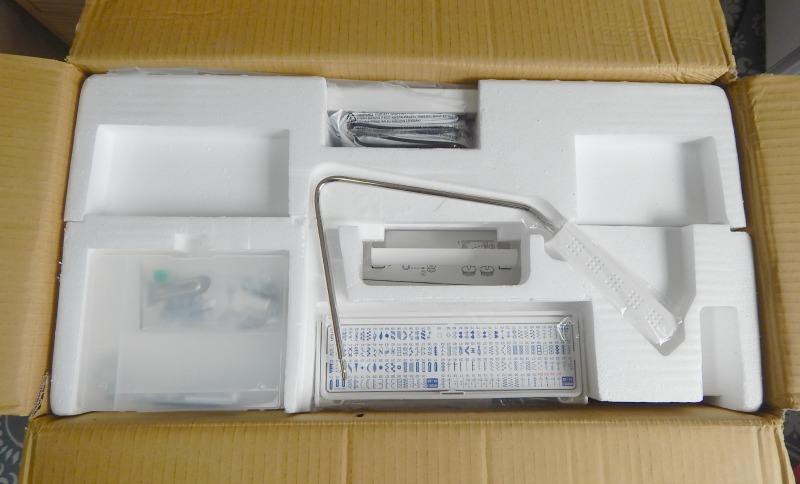


In addition to the machine, here are all of the extras that came in my box, still packaged up. The foot pedal is separate from the power cord which I love. The reference board with the stitches on in blue, the knee lift lever, the dust cover (bottom left), the box containing the feet and accessories at the top, and they're all sitting on the extension table.


*Free motion foot (top)
* Overedge foot (2nd row on right)
*Rolled hem foot
*Zipper foot
*Satin Stitch foot
*Open toe Satin Stitch foot
*Blind Hem foot
*Cording foot
*1/4" seam foot
*Overcasting foot
*Dual feed foot (bottom left)
and finally
*Automatic buttonhole foot
That's as standard! My last machine came with a regular foot and a zip foot as standard!
You know my thoughts on adjustable zipper/piping feet, but I haven't had a chance to get one for this machine yet, so I tried doing a zip pocket with the dual feed foot and by jove it worked incredibly!
Back to the machine, on the front is a stitch balancing adjusting screw (left), then the hole for the knee lifter (pivoting on pocket corners without needing to remove your hands from the pocket! Amazing!) and then the drop feed lever. Much more accessible than many machines I've seen!


I love that this machine has a start/stop button as well as the foot pedal. Sometimes you're not able to sew with your feet (that made sense to me...) so having the option to sew without the foot pedal is great.
(Also pictured is the reverse stitch button and the lock stitch button)

I've used it for placing thick fabrics under the foot without them getting pulled out of place or distorted, and more importantly, I've used it when sewing a zip, I just sew to the zip pull, stop with my needle down, lock the foot into the extra high position, and then I have both hands free to wiggle the zip pull out of the way. It is handier than I even ever thought it would be!


From above then you can see the foot pressure dial on the left, the threading guides on the middle and right. I love a machine that tells you how to thread it!

On the right near the front is the bobbin winding mechanism. On this machine you bring the bobbin winder stopper to the bobbin, not slot the bobbin into place which confused me momentarily. It doesn't take a lot!

The buttons pictured from top right are:
* Mode - To select which stitch mode before choosing which stitch number
* Letter style button - Yes, this machine writes too!
* Memory/recall button - You can program the machine to remember your favourite pattern combination. Perfect for those of us who baste over turning gaps!
* Twin needle button - If you can't sew two lines of stitching an even distance away (top stitching pockets), then a twin needle is perfect for that!
* Elongation button - for elongating satin stitch patterns
* Bobbin winding button - It stops automatically, you just have to set it going
* Stitch width adjusting button - Press left for narrow, right for wide
* Stitch length button - this machine goes up in increments of .1mm, you can get really exact! The standard length for straight stitch in Mode 1 is 2.2mm.
* Edit button - Use for editing programmed patterns (or scrolling left when in edit mode)
* Help button - Press this button and see alternative applications of certain stitches - more to follow. (You can also use this to scroll right when in edit mode.)

At the right of the machine is the hand crank wheel, the on/off button, the holes for the power cord and foot pedal and the dual feed adjusting dial.


In addition there's an auto thread cutter button, so your machine will know to cut the threads automatically after the last memorised pattern, and a locking stitch button, so your machine will sew the pattern combination, lock the stitch, then stop automatically.
At the bottom there's a Clear button to delete a pattern from the programmed pattern combination, there's a 'turnover' button, so your machine will sew the memorised pattern in reverse... or memorise a pattern in mirror image. And finally there's the memory button. You can press this button to memorise the desired pattern. This machine can memorise up to 50 patterns. I really need to have a play with this, I can see that coming in super handy!!

I've used it a bit over the last week and the one and only criticism I can come up with is that the light is not as white as I'd like it to be. We have daylight colour bulbs in the ceiling lights in our studio, so the bulb of the machine not being daylight colour is slightly noticeable. That's not bad if that's the only criticism I can give you so far!
I'll be back with a full review once I've gotten to grips with it, but for now, I can definitely say I love the Janome 6600p!


4 comments
I hope you get on well with her. I got a Janome Atelier 5 last year and I LOVE it. The knee lift is the best thing ever. As she's so heavy, I take my crappy old machine to guild meetings and I'm forever trying to knee lift nothing! I also love the scissors function on mine. I didn't get an extension table, I must get one at some point. I've not sewn much this past year as I've been pretty ill, I finally fancied it on Saturday, sat down at my machine and... clunk clunk clunk. So she's at the vets.
ReplyDeleteOh no! Hope it's better soon
DeleteI have the Janome DC3050 which has the speed limiter and automatic threader, and bought myself that retracting foot pedal. However I am jealous of the Accufeed, knee lifter, and start/stop facilities. Mine has 50 built in stitches including that auto buttonhole foot, but yours has so much more. Think it might be time for me to upgrade, especially when I see all the extra space and the extra table all making it easier to fit bags under the machine! I am so glad you posted this, how are you getting on with actually using it?
ReplyDeleteI absolutely love it! I'm going to write a full review of it once I've had a chance to use it properly
Delete