How I made the Granny's knickers bag
08:00
Let's all be honest right from the start. If you're a seamstress/crafter/hoarder, somewhere you have a merry band of unfinished projects.
Well I have a drawer, a filing cabinet sized drawer to be exact. Inside this drawer was a set of linen tops from when I was testing the Rosie bag and a lining that I was too small. I don't know what happened with the lining, it was about 2" too small for a Rosie so into the drawer it went while I knocked up another lining.
Add to them an overflowing box of lacy trims and broderie edging and the backwards mullet bag was born.
I added some heavy sew in interfacing to the back of the calico base panel before I started stitching my trims on.
I started right at the top of the calico panel with my first row of lace.
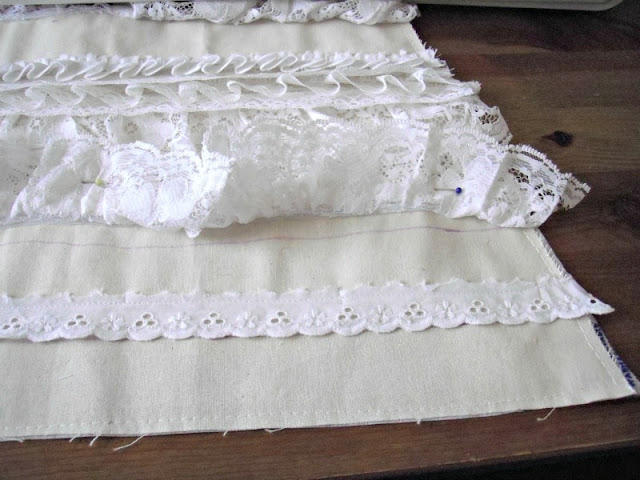
Next, I drew a line just under where the lace ended and then flipped it over out of the way. I used the line as a guide for the bottom edge of my next trim down and then pleated the broderie edging, pinned and stitched into place.
I carried on adding trims down the bag alternating flat, pleated, ruffled, and the different types of trim for extra texture. I'm pretty certain 'added texture' is an artsy fartsy phrase and I'm really an artiste.
I just pinned the trim out of the way and added the next lot and worked my way down. In theory, marking lines means it'll be less wonky.
When I got to the bottom base line that I drew in the first instance I made sure my trim was level with that line. I didn't want my trim to be dragging on the floor once I'd boxed the corners.
I wanted the bottom lace layer to have a bit more flare so I added 4 layers of the broderie edging in the end. I like it because it looks like a show girl's petticoat under that last lot of lace. :)
Then I went down the edges and trimmed any overhang on either side of the calico panel.
I stitched the linen top to the calico base as per the Rosie pattern instructions, pressed the seam outwards, attached my fleece stabiliser to the whole piece and then I was ready for the last embellishment.
I found some beautiful satin trim in my stash and pinned it on to cover the seam between the linen top and the lacy calico base. I hand stitched the top into place along all of those wibbly flowers.
Then, deciding that a ton of lace, a few half meters of broderie edging and some extra satin lace was not enough, I added some white buttons from my stash. I used a button on top of a button in the centre.
They're all stitched and secured individually in case one gets caught and comes off 3 years down the line. I didn't want them all to unravel!
I did of course do the diamond quilting that the pattern calls for. I find it's easiest to not argue with myself, even when I'm me.
If you want to make your own, please see my Etsy store to purchase the pattern for the princely sum of £3.
This is the bag I made to enter into the Sew-vivor competition.


4 comments
Oh my, I hope you'll WIN!!! That is beautiful, and I love the addition of the buttons. Nice touch.
ReplyDeletelove that purse
ReplyDeleteI love it! A clever way to use up the lining and the outer looks great. I was just looking at my two very full boxes of lace a few days ago and wondering how to use up some of it. Now, thanks to you I have an idea for some of it. Yeay for the internet,blogging, pinterest and all the cross-polination of ideas.
ReplyDeleteI hope you arein the finals and go onto win - I shall be following closely.
oooh, looks sexy! I'm really behind with my blog reading and have "sorted by magic" in Google Reader so I might have missed it - have you shown us the finished bag?
ReplyDeleteYou know your air erasable pen? You didn't iron the fabric after drawing the line did you? that makes it permanent...