
Travel Changing mat with zipped pocket {Free tutorial}
11:26 |
 |
 |

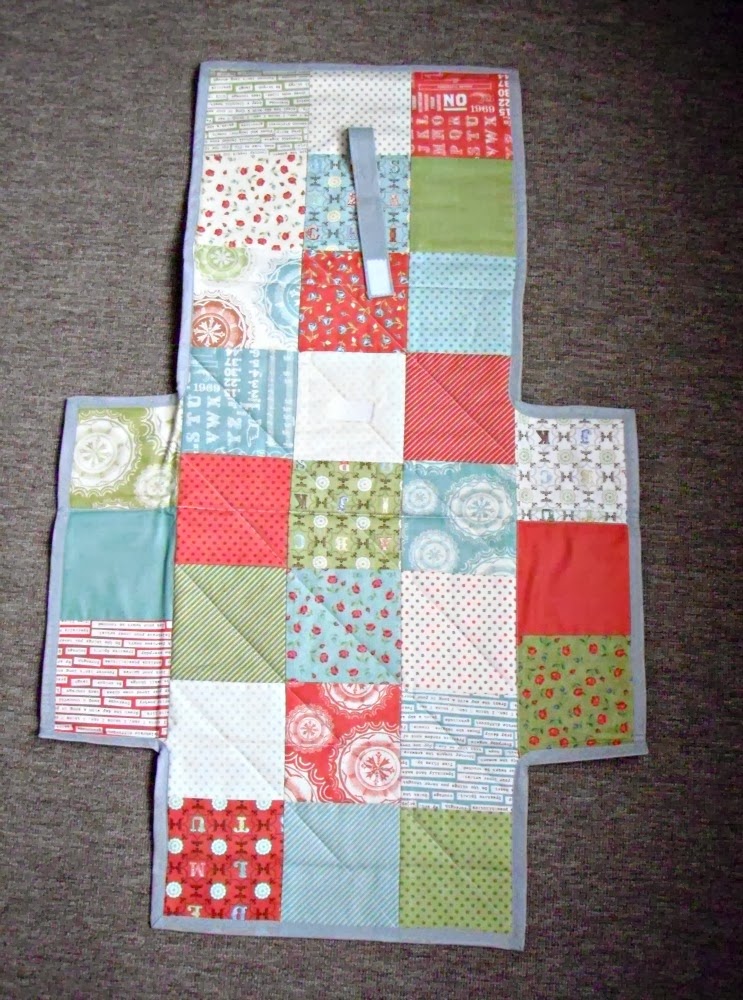
I made this washable, folding travel changing mat a while ago for a friend of mine, and took some photos so I could share the process with you. It's got a zipped pocket at the foot end, ideal for a spare nappy and some baby wipes!
I used 36 x 5" squares from a charm pack, a pack of light grey double fold bias binding, a meter of white flannel (prewashed) and a piece of fusible fleece around 24" x 13". I also used 2" of white velcro & a 14" zip.

The finished size is 34" long x 21.5" wide (at it's widest) and it's 9" x 13" when folded up, ideal for slipping into a nappy bag!
You may find a walking foot helps when sewing the flannel.
Firstly I chose which squares I wanted to use and laid them out in a 'random' way. Of course we all know I have issues with random so really there's one of each style/colour placed evenly!

I chose to do 8 rows of 3 squares each, then a row of 3 on each side.
Pop the other 6 squares to one side for now, they'll form your zipped pocket.
Stitch your 3 long rows together, then your short 3 rows. I placed the centre square of the short side row level with the 3rd seam down. This will be classed as the head end with the longer end of the cross the foot end.

Once you've sewn your squares together and pressed the seams flat, it's time to cut the fleece for your mat. I wanted to reduce bulk in the fold lines so I cut mine to be around 2/3 down the first row of squares, and ending in the 6th row of squares. (Approx 24" x 13", but check on your own mat)
Iron the fusible fleece onto the patchwork piece, from the cotton side, with the fleece down on your board to avoid marking your iron.
If you wish to quilt your patchwork backing, now is the time to do so.
Sew the other 6 squares together in two rows of three to form your foot pocket. Cut a piece of flannel to match this size. You may wish to interface your 6 square panel for extra stability and if you want to quilt your patchwork piece, now is a great time to do so!

Fold your layers back, and top stitch along your zip to keep the flannel lining in place. I also basted around the three sides to keep them together.

Cut a piece of your bias binding and attach it to the raw edge of your zip. I bought double fold bias, but if yours is not folded, press it with an iron and then slot the zip edge inside before stitching.
Cut a piece of your flannel to match your large patchwork piece and then lay your zipped pocket on top, lining up edges.

Next, cut another piece of double fold bias tape 9.5" long, and stitch the short ends together, right sides facing. Turn the bias out and press well so that all of your raw edges are hidden. Sew along both long edges to keep it together.

Cut a short length of soft velcro and stitch it to one end of your binding tab. I used the soft velcro on the tab so that it didn't get caught on any knitwear when unfolding.

Place the other end of your binding tab at the very edge of the first square in the centre of your patchwork piece on the foot end. It should be approximately 4.75" up from the bottom edge. Stitch it in place, I used a cross inside a square for extra strength.
Fold your patchwork piece up, as though it were a finished mat and mark where you need to stitch the other side of the velcro to match your bias tab.
This worked out to be in the centre of the 4th square from the foot end for me. Stitch your velcro piece in place.
Sew your patchwork piece and flannel piece (with pocket attached) together with a basting stitch close to the edge, around all sides.

Clip the inside corners of your extra flappy bits! This will help them to sit flat when you fold your inside corners for binding.
Next it's time to bind your whole mat in one go and this can be tricky to go around inside corners. I've taken a few photos to show you, but you'll need to manipulate your mat yourself to really understand, it's hard to just look at the pictures without doing it yourself.
I like to start on a straight edge and pin the binding to the flannel side first. When you get to an inside corner, fold the fabric down and at an angle so that your edges line up side by side as though continuous. Please check out the photos below for a bit more explanation.
 |
| Inside corner on the right, folded down to match the straight side on the left. |
 |
| The binding continues straight despite the inside corner (to the right) being folded down. |

When pinning, make sure not to go through all of the layers, only the layers you want to attach the binding to!

Stitch the binding to the flannel side and then turn the binding over to the patchwork side. It's a good idea to press this as the steam will help you manipulate the binding.

I stitched the binding down from the patchwork side with my machine. The stitches will show on the flannel side, but it's more secure for multiple washings (much needed when babies nappies are concerned!) and the white thread of my stitches blends in easily with the white flannel.
Once you've finished your mat, it's a good idea to fold each fold and press into place to help it sit tidy when it's folded the first few times.

What do you think of my travel changing mat? Do you know anyone having a baby this year?
You could always change the flannel out for a pvc or PUL fabric to make the mat wipe clean. I'm also wondering whether bright white is the best colour for a changing mat?
If you've got any tips for binding around corners, please feel free to share them in the comments, it's a tricky thing, and I'm no binding expert!!


7 comments
That's so cute and a project that I don't have to worry about getting done in the near future as I'm not planning on any more kids and my kids aren't planning on making me a grandma in the near future.
ReplyDeleteCute pattern.... and great for a baby shower gift! I am filing this away for future gifts to give!
ReplyDeleteSusie
It looks good and you know I LOVE that fabric choice. I am not so sure about the white for the inside... perhaps greenish/yellow ;) lol. It is a clever idea to include the zip bag as the end too.
ReplyDeleteVery nice!! Every mom of a baby needs one of those!!
ReplyDeleteLovely! I have a few friends and family member's that are having babies so this would be fab to make for them :)
ReplyDeleteI would still use the white fabric but make a small PU mat to keep in the pocket to lay under baby's bum for messy changes :) x
This was the bestest most practical gift I recieved for lg!! All mummys should have one still take mine everywhere and was so much easier than humphing a big change bag around.. I used to put lgs towel n clean vest etc in middle before folding when going to baby massage holds more than you would think. Andddd its way prettier than my original change bag anyway xx
ReplyDeleteThis was the bestest most practical gift I recieved for lg!! All mummys should have one still take mine everywhere and was so much easier than humphing a big change bag around.. I used to put lgs towel n clean vest etc in middle before folding when going to baby massage holds more than you would think. Andddd its way prettier than my original change bag anyway xx
ReplyDelete