
How to sew a zipped pocket
14:07
Fuse one piece of your lightweight interfacing to your zipped pocket piece and one to the back of the lining where your pocket will be positioned.
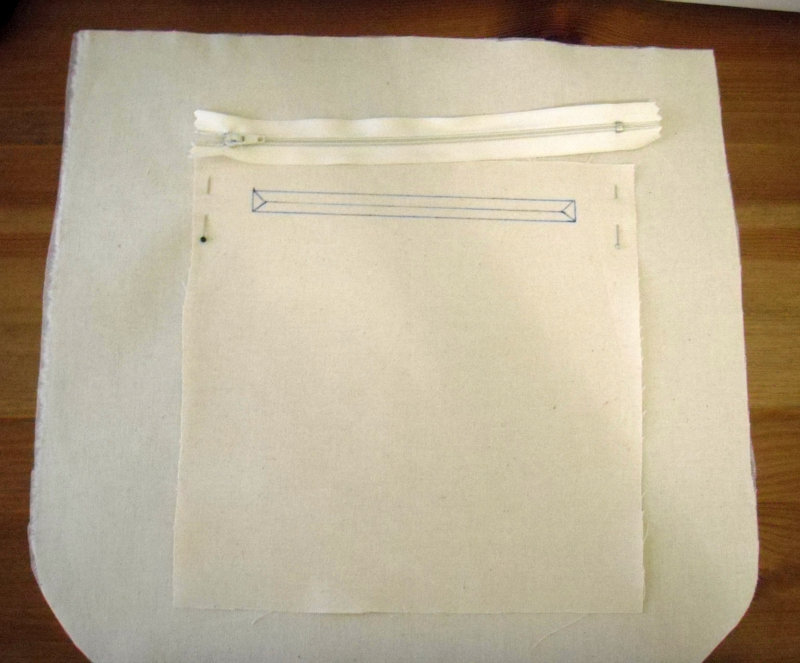
To create the zipped pocket lay one interfaced piece right sides together in the centre of lining piece and pin at the edges.
Measure the teeth of your zipper and mark a box with fabric marker or pencil of that length with a height of 1/2” (1cm) in the centre of piece about 1” (2cm) from the top. I use a Frixion pen which disappears when heat is applied.
Draw a triangle at each end within the box and connect with a central line, this is where you will cut through both layers once sewn.

Sew around the outside of the box and then cut through the triangles and central line. Remove your pins.

To ensure your front piece lays flat, I like to do a bit of extra manipulating with my iron. Slide your iron up to the seam between the pieces and repeat for all 4 sides. You should end up with this.

Push the pocket piece through the lining piece to the back.

Press well and manipulate the fabric to lay flat. If you press from the front first, no matter how awkward then any puckers will be on the back.
 |
| Before pressing |
 |
| After pressing |

Next you need to pin or glue your zip to the back of your opening. Pinning will more likely shift it out of the way so I like to use a specific sewing glue such as the Hemline glue pen.
If you're in the UK you can get one here. This isn't the one I've got, it's about half the price!
I always go overboard on my glue but it dries clear and doesn't gunk up your needle so the more the better in my mind!

So now turn your fabric right side over and position your zip in the opening.
Change your presser foot for your zipper foot (or piping foot) to sew this and sew very slowly.
This is an adjustable piping foot. BUY ONE NOW, it will change your life.

These types of zips do take practise but if you're slow and steady you can achieve a professional finish easily.
Sew along the edge of your fabric opening trying to keep your zip straight. As you approach the zip pull leave the needle down and lift the presser foot.

See how close you can get with this foot?
Unzip the zip until the pull is out of your way, lower your presser foot and sew on until you need to re-zip.
Continue round all 4 sides of your opening.

Ignore the blue glue, it dries and disappears in a couple of hours. See how neat and close my stitching is the with piping foot? That's not from practice, it was like that the first time I tried using it as opposed to my zipper foot!
Pin the second pocket piece to the front pocket piece on the back of the lining without catching the lining piece and sew around all four sides.

That's your zipped pocket done. :)


10 comments
Thank you, Samantha! I needed this post. You make it look so easy and I'm now ready to attempt it again. The zipper pocket will NOT defeat me! Lol!
ReplyDeleteI still need to find a piping foot for my machine.. but I don't think my stitches would be as neat as yours. Something I'm working on!
ReplyDeleteI have a blind hem stitch foot for my machine (at least I think that's what it's actually for), but it works perfectly as an edge stitch foot and I can adjust how far I want to sew from the edge. I love finding multiple uses for these machine feet.
ReplyDeleteThese are great instructions, too! I had never made this kind of pocket before I made your first bag pattern and it turned out perfectly for me :)
A piping foot!? Another sewing foot to add to my wish list.
ReplyDeleteDidn't you realise that crafting is just an excuse to buy lots of crafting materials? :P
DeleteP.s. I tried to reply to your email but it came up that you're a no reply blogger :(
Great tute! Love the glue idea, must give it a try, I still do it the old way with pins.
ReplyDeletePiping foot, another clever trick. I bought a piping foot a little while ago, I think I will try it out...
My new machine has a super wide zipper foot which has been driving me crazy as I can't get a close as I need to get. I went into a store to buy the expensive narrow zipper foot and the lady asked me what I wanted it for? When I explained it, she suggested that I use the needle width adjustment and move the needle over, that way I get the benefit of lots of grip from the foot and the ability to get right in close where I need to. I tried it on the pattern test bag and it worked! No muttering and mumbling about manufacturers who build a new machine with two zipper feet so they can charge an extra $45 to buy a narrow foot.
Ive done a few of these and still haven't quite mastered them...Great tutorial, Thank You!
ReplyDeleteYou've come a long way with your tutorials. Beautiful clear photos and instructions just how I like them.
ReplyDeleteWOW what perfectly straight stitching ...can you do a tutorial how to prevent the wobble top-stitching ?? LOL
ReplyDeleteWow! NOW I know what that foot smcalled! I use it for zippers and piping....didn't know what it,was intended for but it works great on both....and NOW I know why!
ReplyDelete